
Creating interactive pages for a memory book without using glue ...!
Recently I shared a video showing a technique where by you could add smaller pages to a main memory book page and no glue was required using Tonic Studios Keepsake Memorable Moments Creator Insert dies! That got me thinking ... I wonder if it would work with the other decorative dies in the same collection - Book of Special Memories and The Life you Love - which also make holes in the spine? So off I went to have a play and this is what I came up with using Tonic Studios Book of Special Memories Keepsake Creator Insert dies...


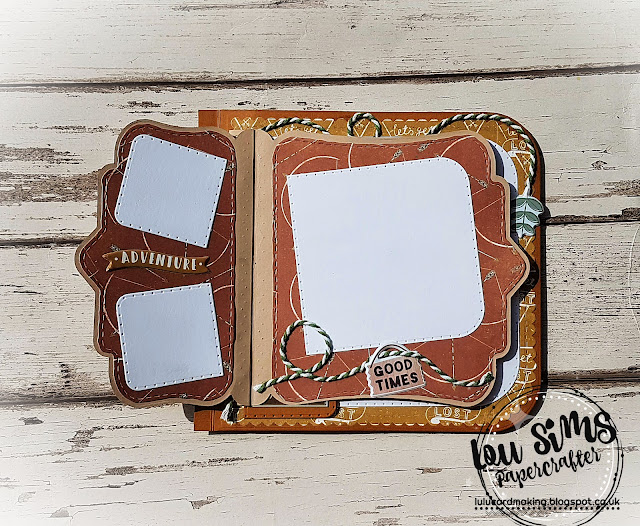
I began by cutting two pages, using the outside edge from the "Book of Special Memories" Keepsake Creator Insert dies and these will become my interactive pages on a much larger page for a memory album.


Side one ...

... flip over to reveal side 2 ...

As you can see, it did work ...!
I began by cutting two pages, using the outside edge from the "Book of Special Memories" Keepsake Creator Insert dies and these will become my interactive pages on a much larger page for a memory album.
My base page is made using "Life's Journey" base creator dies and I've backed both sides with my chosen paper. Next taking using one of the decorative spine dies and the smaller pages - cut from Book of Special Memories outside edge - added the holes/slots on the crease side to both. Carefully transferring these marks to my base layer, I used the same die to create matching holes. If this instruction appears confusing, it is explained and demoed in the video - see HERE @ 29:10
Side one ... showing the stitching for this side

side two ... showing that there is a different stitch on this side ...

Using 2 pieces of Nuvo Twine, I began joining all three elements together - in other words, stitching everything together. What's absolutely brilliant, is that each side has a different stitch effect but achieved at the same time. So cool! Rather than try and explain the process as I'm not sure I could describe it adequately, please pop over to the video where I explain and demo the idea in full - see HERE @ 33:40
Once the pages were joined, all that was left to do was decorate and add any finishing touches.
Side one - inside cover

side two - inside cover

I'm really pleased how these pages came together and love the fact that I can use this technique to create masculine feeling pages and not just rely on ribbon - which might give a feminine feel to a project. I also tried to mirror the decoration on both sides, to create a cohesive design.
Side one - back page and also base page that these pages
have been stitched directly to

Side two - back page and also base page that these pages
have been stitched directly to

You can check out the video below on my You Tube channel by clicking the photo or the link underneath. In the same video I share TWO quick ways to use the dies to create wonderful memory books.
Thanks for popping over and if you have any questions, leave me a comment and I'll try my best to answer.
Until next time,
Lou
x
SUPPLIES
I’m listing the products I used below to create my project. Click on the shop link/logo or photo to go directly to the product. Where available I use compensated affiliate links which means if you make a purchase I receive a small commission at no extra cost to you. Thank you so much for your support!
Comments
gr karin