
Use colour to create a different look on handmade cards - featuring Shady Designs Oval Frame It stamps
Sharing THREE cards today that have the same design layout but I have changed the colour of my stamped images. I am using Shady Designs Oval Frame It #1 & Shady Designs Oval Frame It #2 stamp sets ...
.png)
- FULL STEP BY STEP below
- List of all supplies used is at the bottom of this blog post.
- Photos of all finished cards below
- - - - - - - - - - - - - - 💙 - - - - - - - - - - - - - - -
When I make my handmade cards, I love to think of one design idea and then change it up. This could be by changing the shape of the handmade card or changing the colours used.
- Full step by step both in word & photo
- Close up of each finished card
- A list of all supplies used so you can recreate
- Finished card sizes: DL, 6" x 6" and 7" x 5".
- Cut panels to fit these card sizes and we will be working on these
PLEAE NOTE: I am using oxide inks to recreate my backgrounds but any blendable inks will work.
- - - - - - - - - - - - - - 💙 - - - - - - - - - - - - - - -
Let's begin ...
Make a loose inky background using antique linen distress oxide & water on to Dolly Dimples Crafts Ink Perfect Blending Mat. Cover each panel & dry.

Using Shady Designs "Hit The Note" stencil, add some detail in place. Again using antique linen distress oxide.
.jpg)
With the music background stamp from Shady Designs Oval Frame #1 stamp set, add some additional background layers. I am using salvaged patina distress oxide for this part. I am also not worried if I do not get a perfect stamped image.
.jpg)
To add another layer to the background, use the script stamp from Shady Designs Oval Frame It #2 with frayed burlap oxide. Now add the panels to your card bases.
.jpg)
Stamp out the main focal image from Shady Designs Oval Frame It #1 three times and colour in. Also stamp the small bunch image from Shady Designs Oval Frame It #2 six times.
I'm using similar colours that I used to create my background for two of my finished cards but the other stamped images, I decided to a colour differently (see card number 2 below)
PLEASE NOTE: remember to use the right ink for your colouring medium.
.jpg)
On separate card stamp out the larger music lines with salvaged patina three times. Cut out to make banners.
.jpg)
Also stamp the flowers from Shady Designs Oval Frame It #2 as many times as you think you need. I stamped both the larger & small flower nine times. Cut these out and colour. For the colours I used, see the finished cards below.
%20(1).jpg)
Now to make the cards. Add the larger stamped image first, then the banner, next the small oval bunches. This layout will be for all three card ideas.
Once these are in place, it's then all the finishing touches eg: sentiments, small flowers, gems etc.
See the THREE CARDS below to see ...
- - - - - - - - - - - - - - - - 💙 - - - - - - - - - - - - - - - -
You are truly amazing - (idea #1)
This is the finished DL card. My finishing touches were to add the flowers coloured in pink (picked raspberry) and white gems. The sentiment is from Dolly Dimples Crafts Creative Sticker Collection #1

God Bless You - (idea #2)
This is the finished 6" x 6" card. I decided to colour the stamped images with tea dye & mustard seed distress inks. I added some light blue & gold gems. The sentiment is again from Dolly Dimples Crafts Creative Sticker Collection #1

- - - - - - - - - - - - - - - - 💙 - - - - - - - - - - - - - - - -
Thank you for all that you do - (idea #3)
This is the finished 7" x 5" card. I decided not to colour the flower but added colour using a blue gem to the centres. The sentiment is also from Dolly Dimples Crafts Creative Sticker Collection #1

- - - - - - - - - - - - - - - - 💙 - - - - - - - - - - - - - - - -
Isn't it amazing by just changing card shape or colour, how a design can take on a whole new look.
Many thanks for your company today and look forward to seeing you soon.
Take care,
xxx
SUPPLIES
If you want to find out about the products I have used, click on the shop link(s)/icon below. Affiliate links are used where I can but at no cost to you & my full affiliate disclosure can be found here.
Thank you so much for your continued support.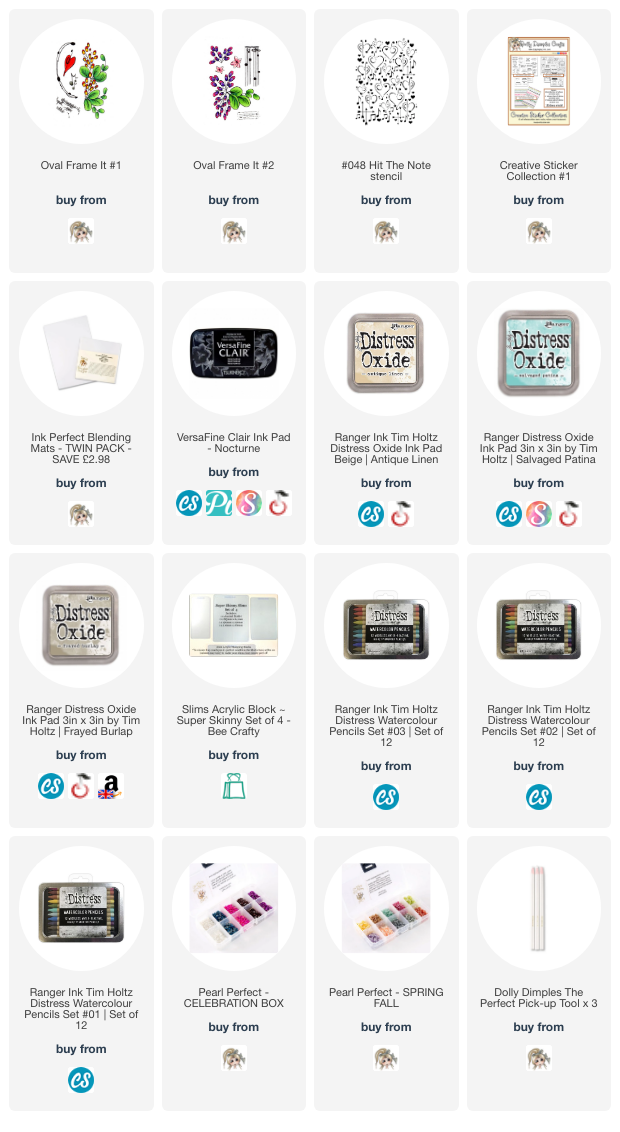
#shadydesigns #lousims #louisesims #ovalframeit #stamping #cardmaking #cardmakingideas #handmadecards #religiouscards #birthdaycards #birthdaycards #birthdaycardideas #watercolourpencils #distresswatercolourpencils #timholtzwatercolourpencils
Comments
gr karin